Need advice? Let's talk.
Get straightforward guidance from your broadcasting partner. Schedule a call to chat with the team about your radio station.
Book DemoHow To Make DJ Mixes for Radio on Your Computer
Not got any decks? Discover how to make professional-sounding DJ mixes for radio using only your computer.


Radio and DJ mixes often go hand-in-hand. Global superstars to bedroom DJs (and everyone in between) use radio to show off their talents outside the club or festival space.
Yet DJs have to record live mixes from their decks or DJ software in real time. Meaning an hour long mix takes an hour to record. And that doesn’t account for preparation or mistakes!
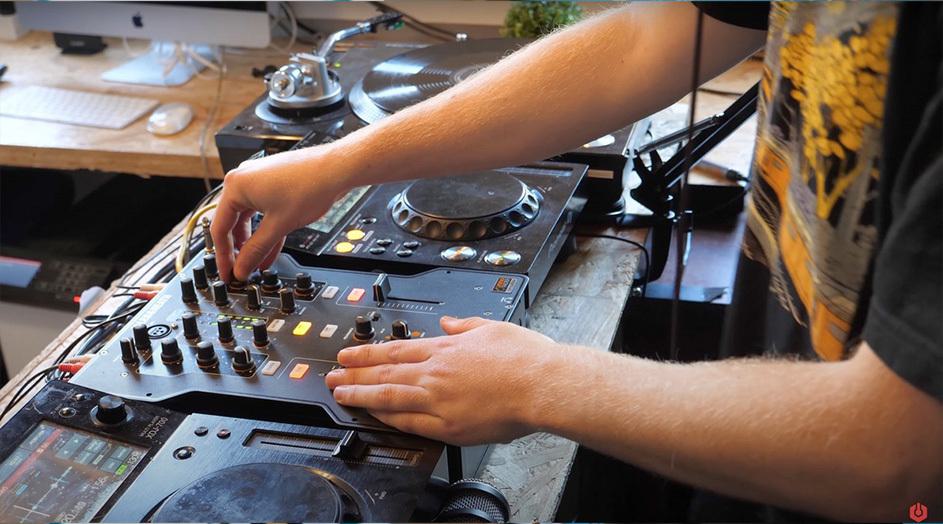
Recording from decks is all well and good, but this restricts many DJs and broadcasters. Think of the DJ finding themselves in a sticky situation when the studio is fully booked and they have to turn in a mix in. Or the just-launched small station, tasked with creating hours worth of content with limited time and budget.
Syndicated radio shows can help with filling up a schedule, but what’s available isn’t always the perfect fit for your station.
Thankfully, DJ Studio offers an effective and alternative solution.
Introducing DJ Studio: A Helping Hand for DJs & Broadcasters
DJ Studio drastically speeds up creating professional DJ mixes for radio, using only a computer. Anyone with a computer and DJ studio license can create a professional sounding mix with exciting and clean transitions. Its easy-to-use programme is suitable for professionals and amateurs alike.
While Radio.co’s voice tracking feature speeds up creating traditional format radio shows, DJ Studio does this for DJ mixes for radio shows. Letting DJs of all skill levels demonstrate their creative flare.
So, whether you're a touring DJ stuck in an airport lounge, or a beginner broadcaster wanting to get your station off the ground, DJ Studio has you covered.
DJ Studio Overview
DJ Studio is audio mixing software for DJs, radio hosts and content creators. Compatible with Windows and macOS, it's a powerful programme for easily creating radio shows, DJ mixes, video mixes, mashups and edits.
Complete with AI features, DJ Studio automates many time-consuming aspects of producing radio. Allowing users to create professional-sounding shows & mixes in minutes and without hardware like DJ decks or a controller.
Note: The focus of DJ Studio is on creating mixes and radio shows within the software, rather than live DJing/radio. To use DJ Studio in a live mix or show, then you’ll need to connect it to your live DJ software.
What You Need For DJ Studio
- A compatible computer (see system requirements below).
- DJ Studio downloaded to your computer.
- A DJ Studio license or free trial.
DJ Studio System Requirements
While DJ Studio can be run with the minimum requirements, the optimum requirements will let users get the best out of the software like running stem separation and video mixing.
Minimum System Requirements
Operating Systems
Windows 10 or higher with Microsoft C++ installed or
macOS Monterey 12 (Updated to the latest version) or higherMemory
8GB+ of RAMProcessing
CPU Intel i7 or AMD newer than 2017Sound Audio Output
Speakers, headphones, etc. (internal or external audio device)Audio File Compatibility:
ALAC, FLAC, WAV, AIFF, MP3, AACDisplay Resolution
Minimum 1280 × 768
Browsers
Latest Version of Chrome orLatest Version of Safari
Optimum System Requirements
Operating Systems
Windows Intel i7 or equivalent newer than 2021 or
macOS Monterey 12 (Updated to the latest version) or higherMemory
16GB+ RAM
SSD Disk (Windows)Processing
NVIDIA GPU with CUDA support
Or Apple Silicon M-series Pro chipSound Audio Output
Speakers, headphones, etc. (internal or external audio device)Audio File Compatibility:
ALAC, FLAC, WAV, AIFF, MP3, AACDisplay Resolution
Minimum 1280 × 768
Browsers
Latest Version of Chrome orLatest Version of Safari
Pricing & Plans
There are 4 DJ Studio licenses to choose from. For a DJ studio license, you’ll pay one-price, rather than recurring plans. The pricing does change, but at the time of writing the plans are: Studio ($99), Pro ($149), Pro + Stems ($347) & Ultimate ($199).
The one-time license includes 1 year of updates and support. After 1 year, there's an update package available if you want to keep on receiving updates.
Here's what each plan includes:
Studio
- Mix with MP3 files
- Weekly updates
- Default Transition presets
- Library integration with Virtual DJ, Serato, Traktor Pro, Engine DJ, Mixed In Key and Apple Music
- Beatport/Beatsource integration
- AI Beatgrid
Pro
- Everything from Studio
- Mix with WAV files
- Manual transitions
- Custom presets
- Sample lanes
- Direct support
- Ableton Live export
Pro + Stems
- Everything from Pro
- Stem Separation
- FX Pack
Ultimate
- Everything from Pro + Stems
- Stem Separation
- FX Pack
- Video Export
- VST Support for third party VST3 & AU Plugins
Initial Set Up
To use DJ Studio, including their 7-day trial, you’ll need to sign up by using your Google, Microsoft, Apple or Facebook account and download the DJ.Studio app to your Windows or Mac computer.

Once downloaded, open the app on your computer.
How To Make a DJ Mix for a Radio Show
Creating Your Initial Mix
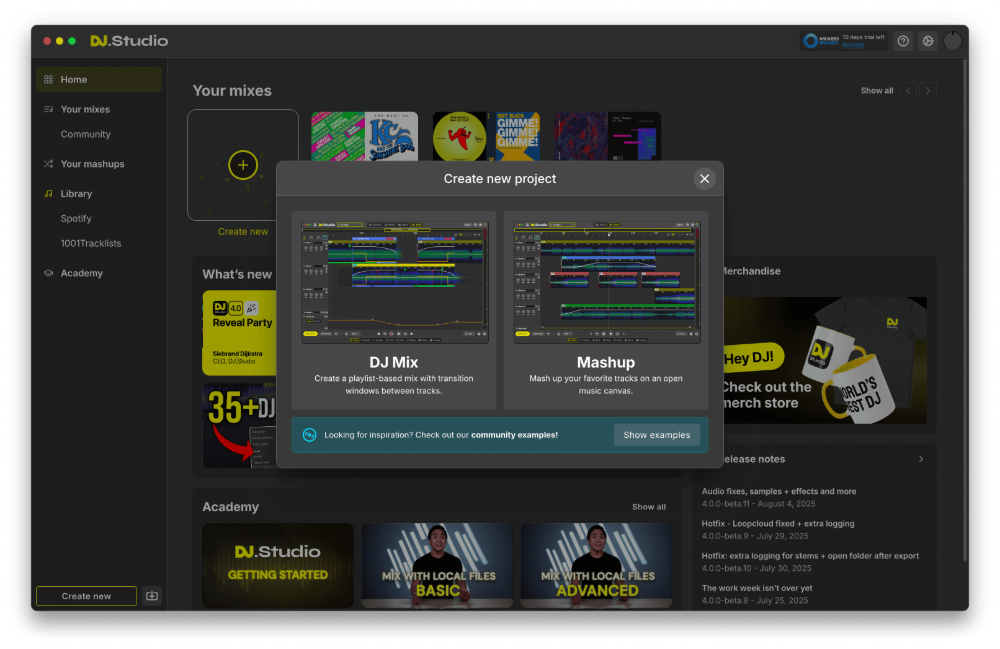
From Home, under ‘Your Mixes’ select ‘Create New’ and choose ‘DJ mix’.
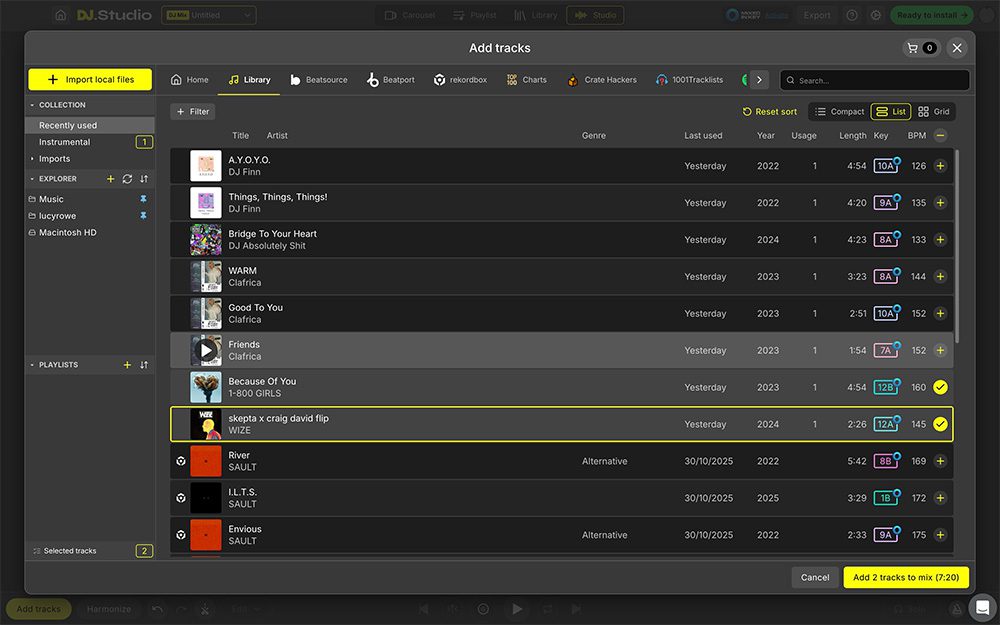
Now you’ll add the songs you want in your radio show. Use audio files on your computer by clicking the ‘Import local files’ button and selecting tracks from your computer.
Find your track, and click the plus icon to add it into your mix. DJ Studio will keep a tally of these tracks to be added, once done click the ‘Add X tracks to mix’ button in the bottom right corner.
Purchase additional tracks through the DJ Studio App using Beatsource and Beatport. Browse charts like 1001 Tracklists or Top 100, add desired tracks to your Beatsource/Beatport cart, and buy them. Alternatively, import your Spotify playlist, and DJ Studio will locate the tracks in Beatsource/Beatport for purchase.
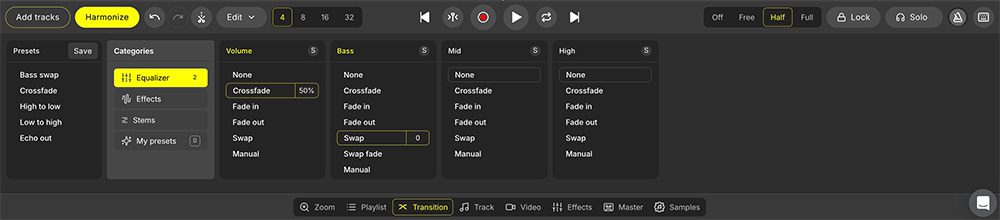
Decide Your Mix Settings in the Harmonize Window
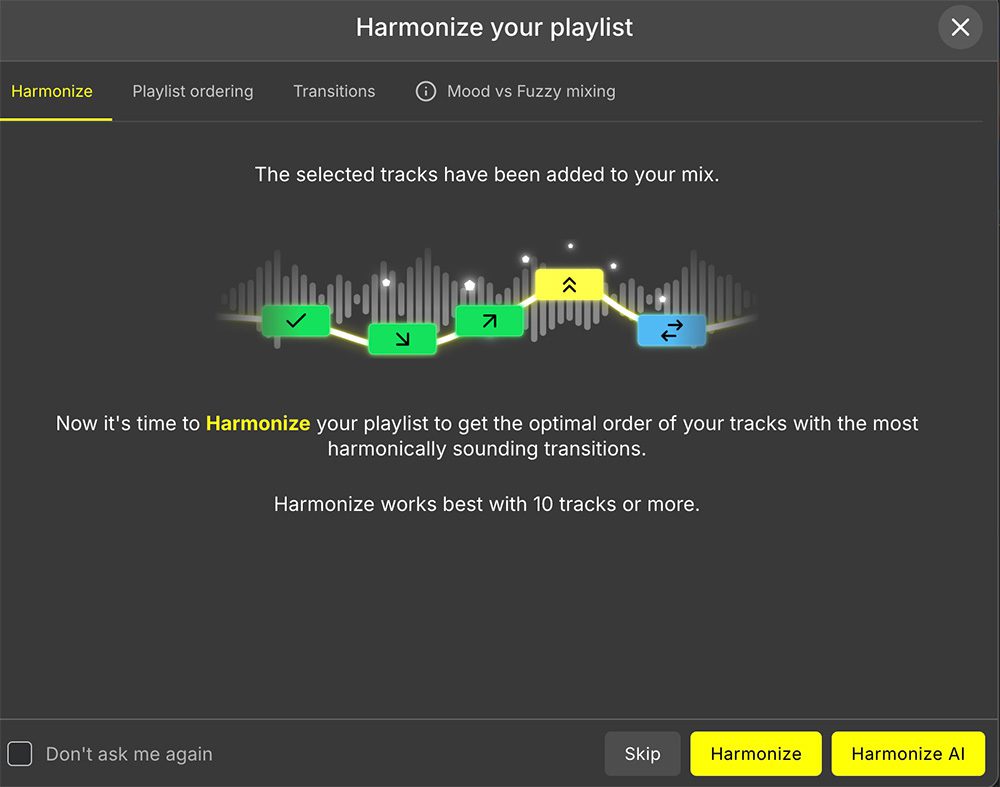
Once you’ve added your tracks, DJ Studio works out an order for these and applies transitions between songs with its Harmonize feature.
The Harmonize feature has default settings, letting you create a mix at the touch of a button. Alternatively, you can change these settings to your preference.
Note: By pressing the skip button, DJ Studio will use the current settings to create your mix and you can only manually set your song order (other than the first and last track) once in the studio editor.
Harmonize Settings
Here's a breakdown of some of the settings in the Harmonize window:
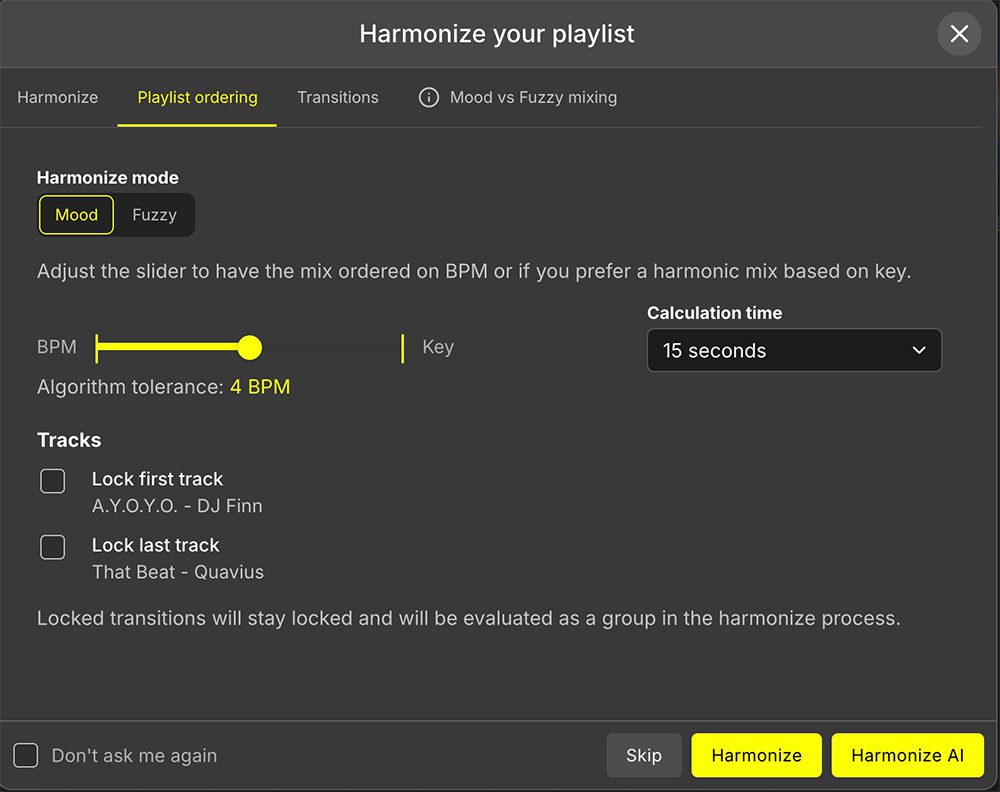
- Harmonize button: Harmonize uses an algorithm to order your playlist in the most harmonic order, within 15 seconds.
- Harmonize AI button: Uses AI to find the ‘best order’ of your playlist in just a few seconds. It gives different results every time you press it. The ‘best order’ depends on if you have Mood or Fuzzy Mixing turned on (see Harmonize Mode).
- Harmonize Mode: Mood mixing looks at harmonic matches (overlapping notes), and additionally at interesting key changes that may favourably affect the overall energy of your mix. Fuzzy mixing always prioritises mixes that are likely to work harmonically.
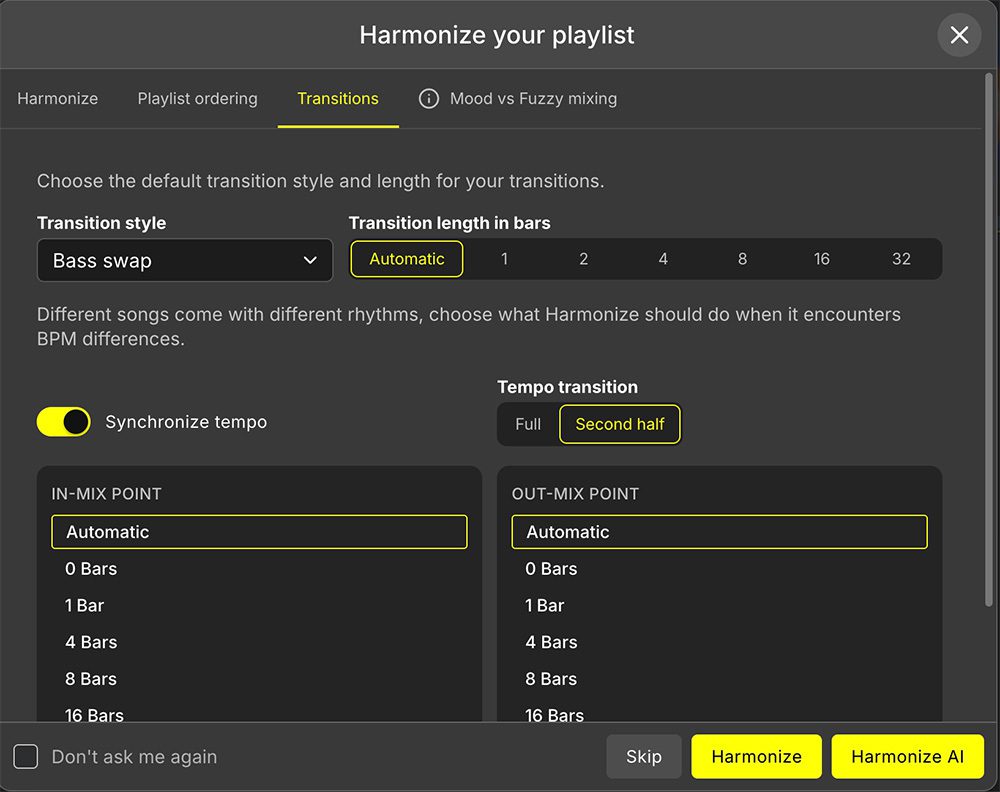
Transitions
- Transition Style: Choose between Bass Swap, Crossfade, High to Low, Low To High & Echo Out as your default transition.
- Transition Length: Set how many bars the transition should last for.
- In-Mix Point: How many bars of the next song will be mixed with the previous song.
- Out-Mix Point: How many bars of the previous song will be mixed with the next song.
- Synchronize Tempo: This syncs (or matches) the tempo of two tracks, allowing them to be beat matched.
- Beat Track Mode: Vinyl replicates a transition if you were using vinyl decks, so the pitch of your songs will be altered with a tempo change. For Re-pitch, AI will try to keep the pitch of the song the same while altering the tempo. Playlist Ordering
Use the slider to set your transitions on BPM and to what degree, or mixed harmonically in key.
For a speedy workflow, add your show’s intro and outro to your mix, and lock these in as the first and last tracks.
Once you’ve adjusted your settings click Harmonize or Harmonize AI to have DJ Studio produce your initial mix.
Note: If you want to adjust your settings once you have an initial mix or have DJ Studio reorder your playlist then the Harmonize button in the bottom left of the Studio editor will reopen this window.
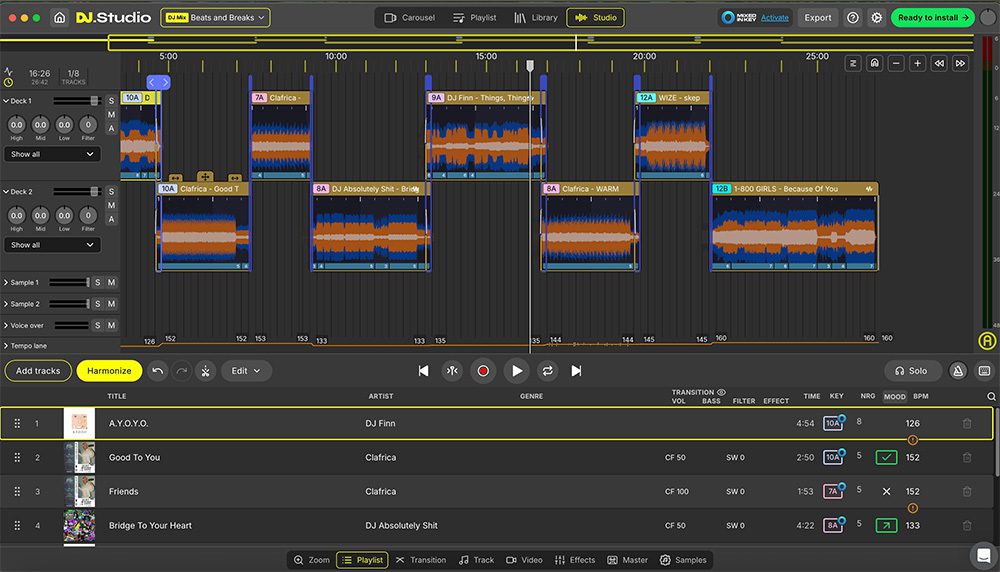
Manually Reorder Your Playlist/ Adding Extra Tracks
If you’re not happy with your song order, click the playlist button at the bottom of the studio view. Here you can adjust the order by dragging and dropping songs into the right position. You can also add extra songs by using the 'Add Tracks' button.
Editing Your DJ Mix
DJ Studio has now created the meat and bones of your mix. To make it radio-friendly, you may want to add some final flourishes, like your show's jingles and bespoke transitions.
Let's look at how to edit your DJ mix...
Adding Your Voice Over
Now you have the structure of your show, you can add your voice over to take it from a mix to a stellar radio show.
We recommend recording a voice over track once you’re happy with the songs you’ve added to your mix. This best practice mimics a live show, as you would only talk about the music you’ve played. Either use the recording feature in DJ Studio's voice lane or use Radio.co’s Voice Studio to record all the talk for your show. Including song introductions, trivia, interesting segues and amusing anecdotes.
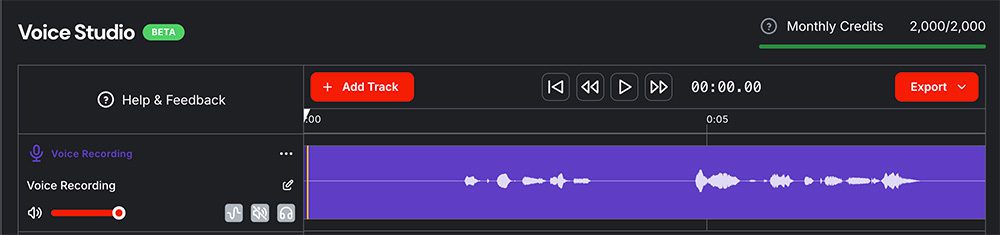
If you've used a different app to record your voice over, export your voice track to your computer. Then drag and drop it to the voice lane in DJ Studio (you may have to enable this lane within settings).
Cut out mistakes and dead air by using command/ctrl + E to select your start & end point and using the delete button. Once you’ve sliced an audio clip, you can trim it by dragging the bracket icon.
Move your voice overs into the correct places by clicking on the audio file and using the 4-point arrow icon to drag the clips.

Duck Audio
With your voice overs in place, you may want to duck the audio of a track (i.e. lower the volume) to ensure your voice can be heard. To do this, select the track and right click to Add Volume Effect. This will give a volume line for your track.
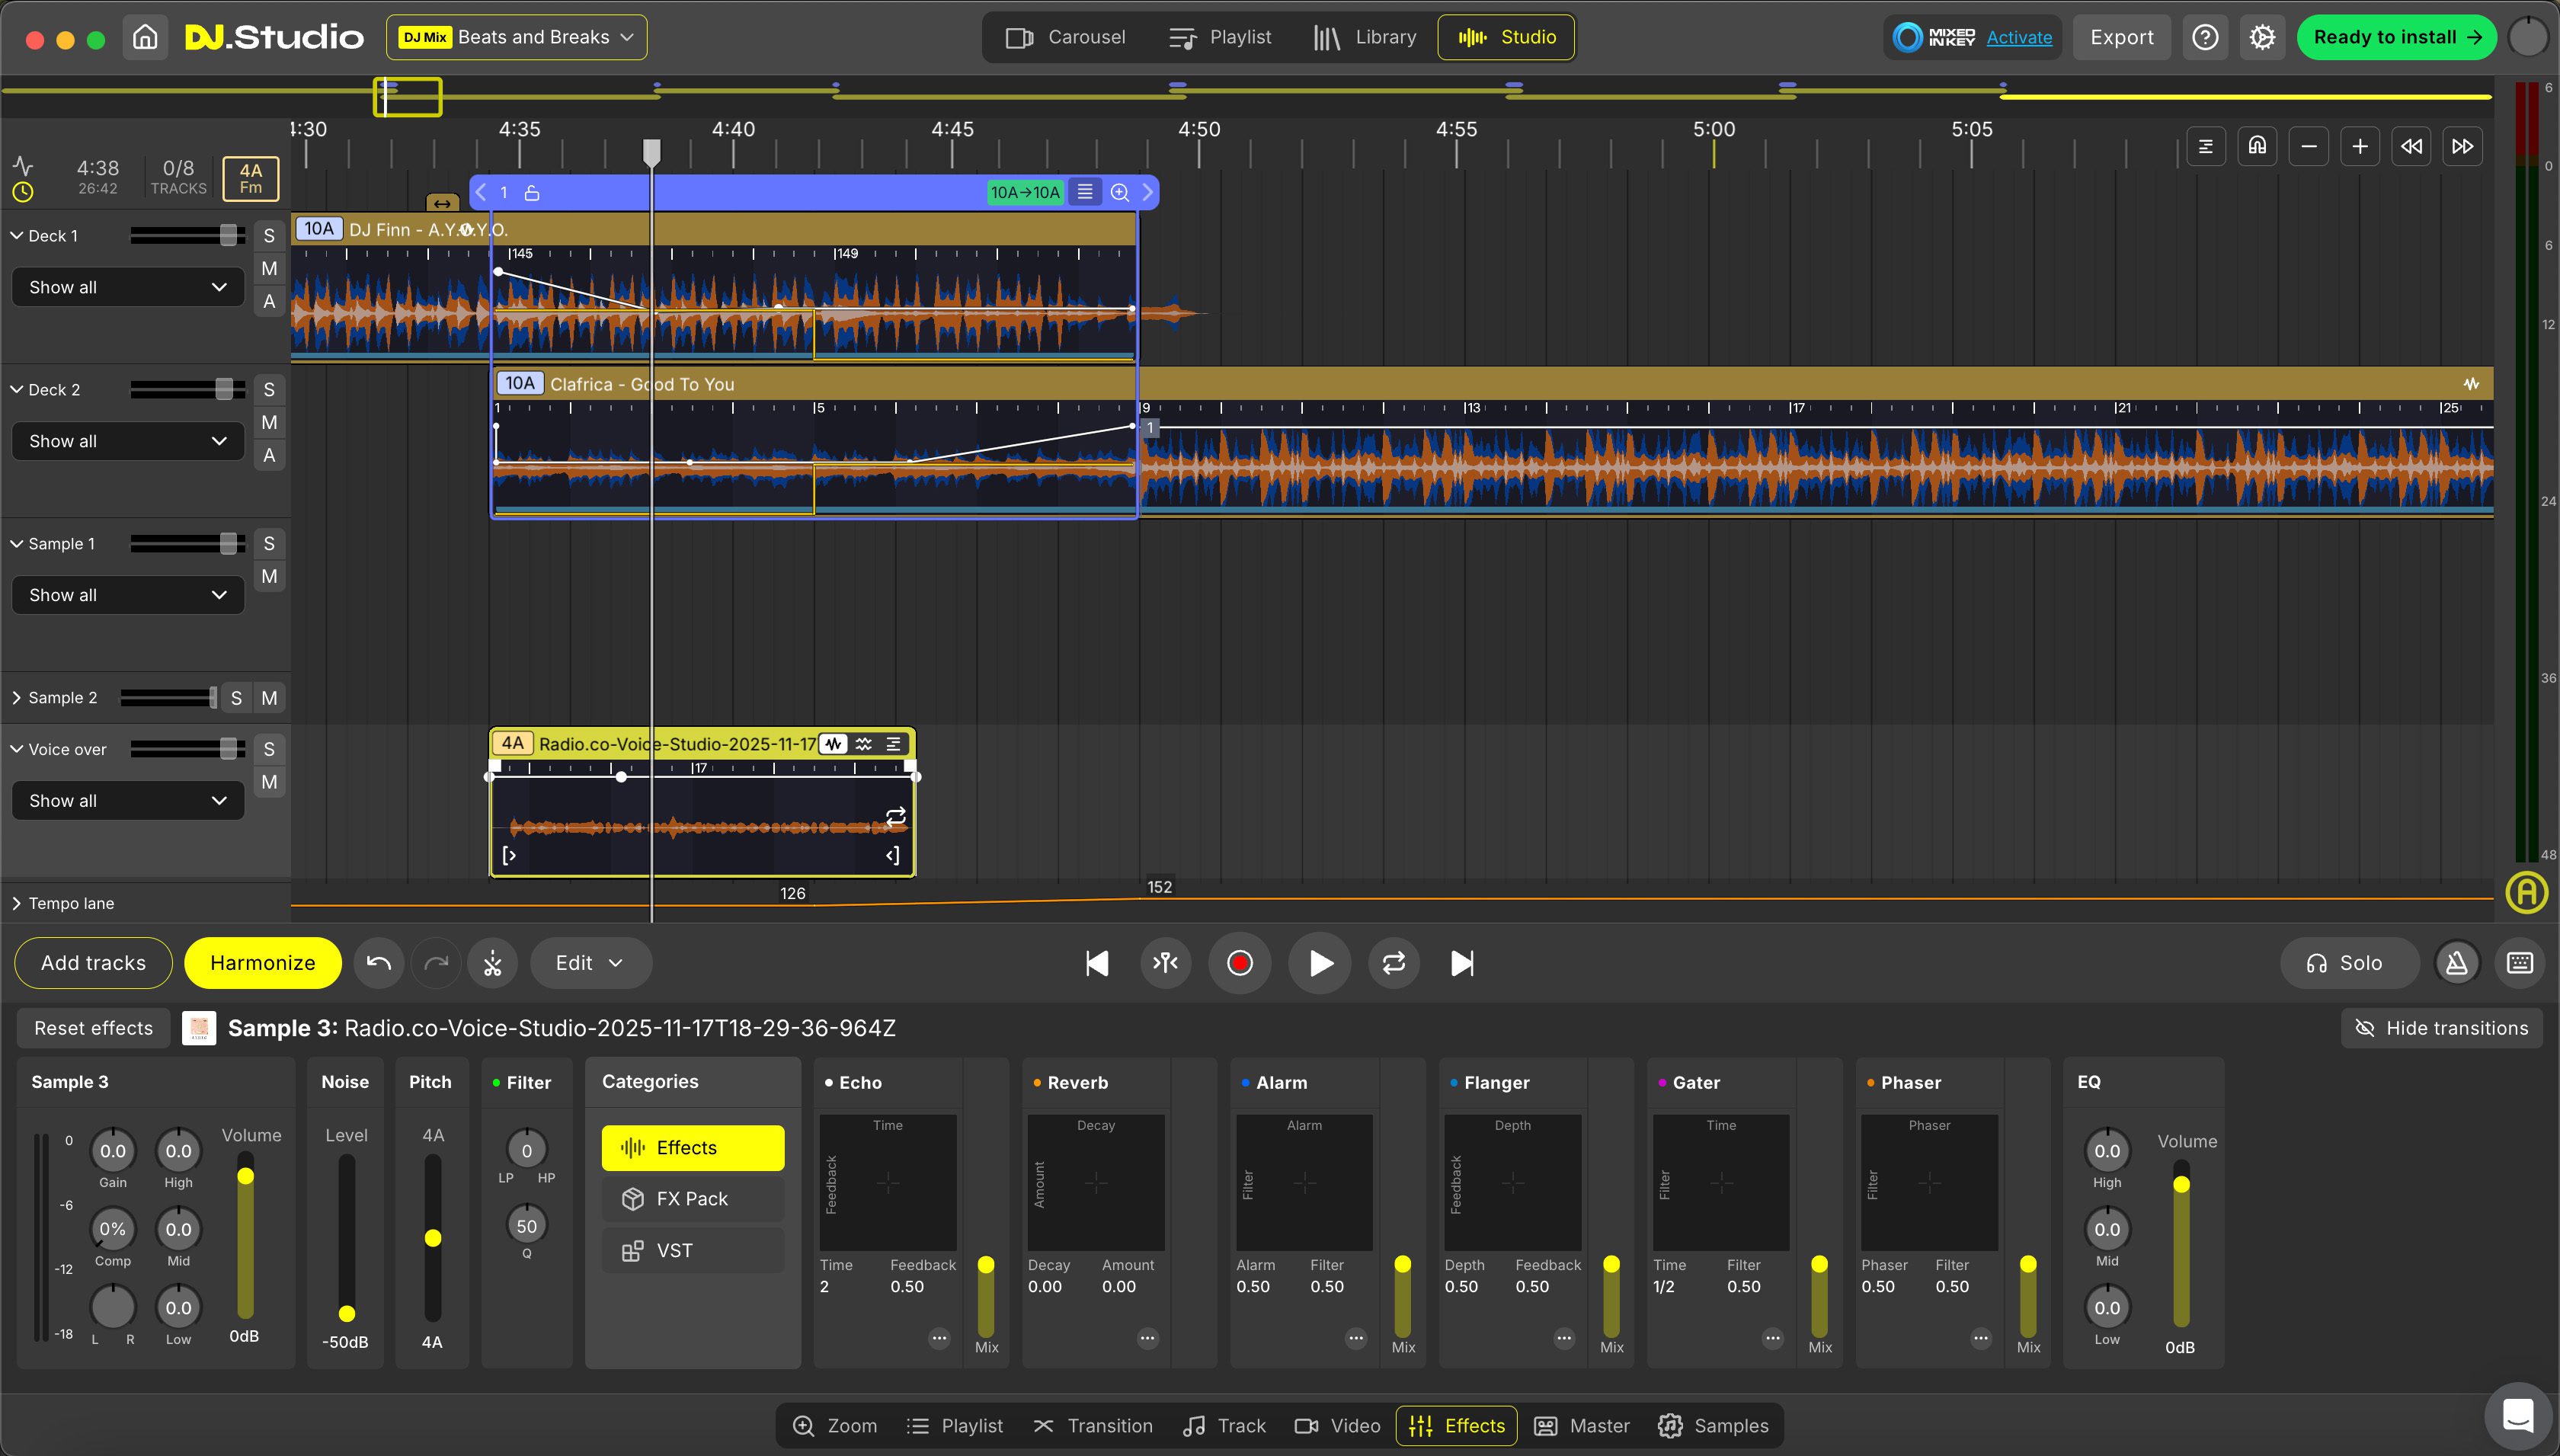
Click to create points on the volume track (e.g. where you want to duck the audio) and drag the line down. The further down the volume line is dragged, the lower the audio volume will be.
Manually Editing Transitions
While default transitions are a great starting point, you can go the extra mile with mixing some of your tracks manually and adding your own touch.
Transitions are identifiable by a blue box around where two tracks meet. Click the blue box of a a transition you want to edit. An open padlock icon indicates this is unlocked and can be edited.
Once you’ve clicked on a transition, this opens up the transition editing window at the bottom of DJ Studio.
Here you’ll have many settings to experiment with and find your perfect transition. Including increasing the transition length by changing the number of bars.
Click the padlock icon when you’re happy with the transition to lock it in place. This saves you from accidentally editing it.
Adding Radio Imaging
It wouldn't be a radio show without at least a jingle or two. For any radio imaging under 1 minute in length, these need to be dragged and dropped from your computer into the Sample lane.
For radio imaging over 1 minute, these can be added to either the Sample Lane or a Deck Lane.
Stem Separation For Creating Music Beds
If you’ve opted for a Pro+Stems or Ultimate License, you can get even more creative with Stem Separation. For example, here you can mute the vocals of a song and leave just the instrumental for your voice to be laid over the top. Alternatively, use the vocal track in the sample lane before the full track kicks in to give your listeners a preview of coming up.
At the right hand end of your audio files, there are 3 icons. One shows the whole waveform, the middle icon splits your waveform into instrumental and vocals, and the 3rd icon splits your file into 4 stems.
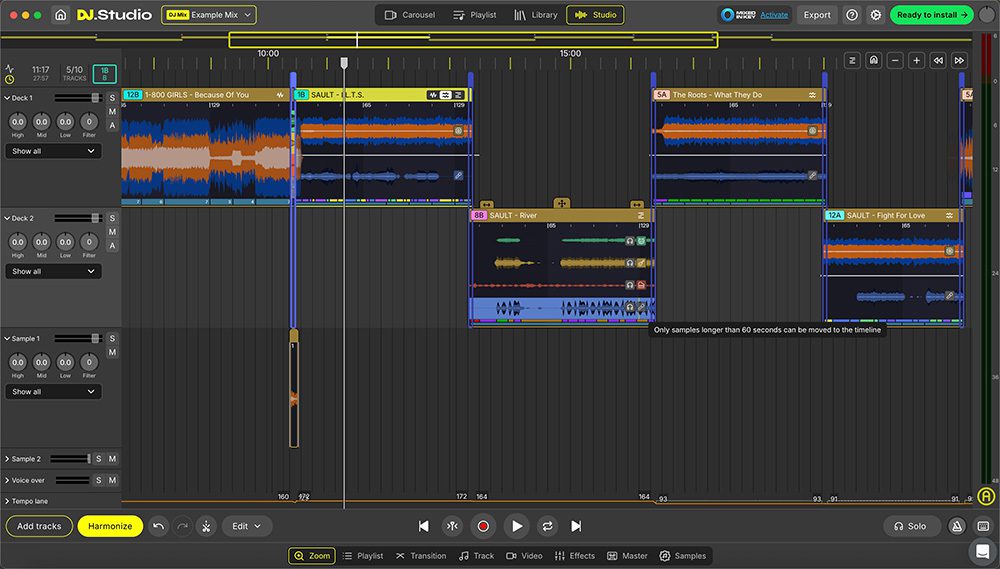
These two buttons let you edit particular elements of your track. Create a music bed under your voice over, by clicking the middle or right hand icon. Now you can edit the instrumental or vocals, select the last part of the song where your voice over is synced up with.
Click the microphone icon and choose ‘Mute Selection’.
You’ll be left with just the instrumental version, allowing your V/O to be heard clearly.
Explore DJ Studio More
NB: We've focused on how DJ Studio can be used for specific radio production tasks, but we've just skimmed the surface. To explore further what DJ Studio can do, check out the DJ Studio Academy or YouTube channel.
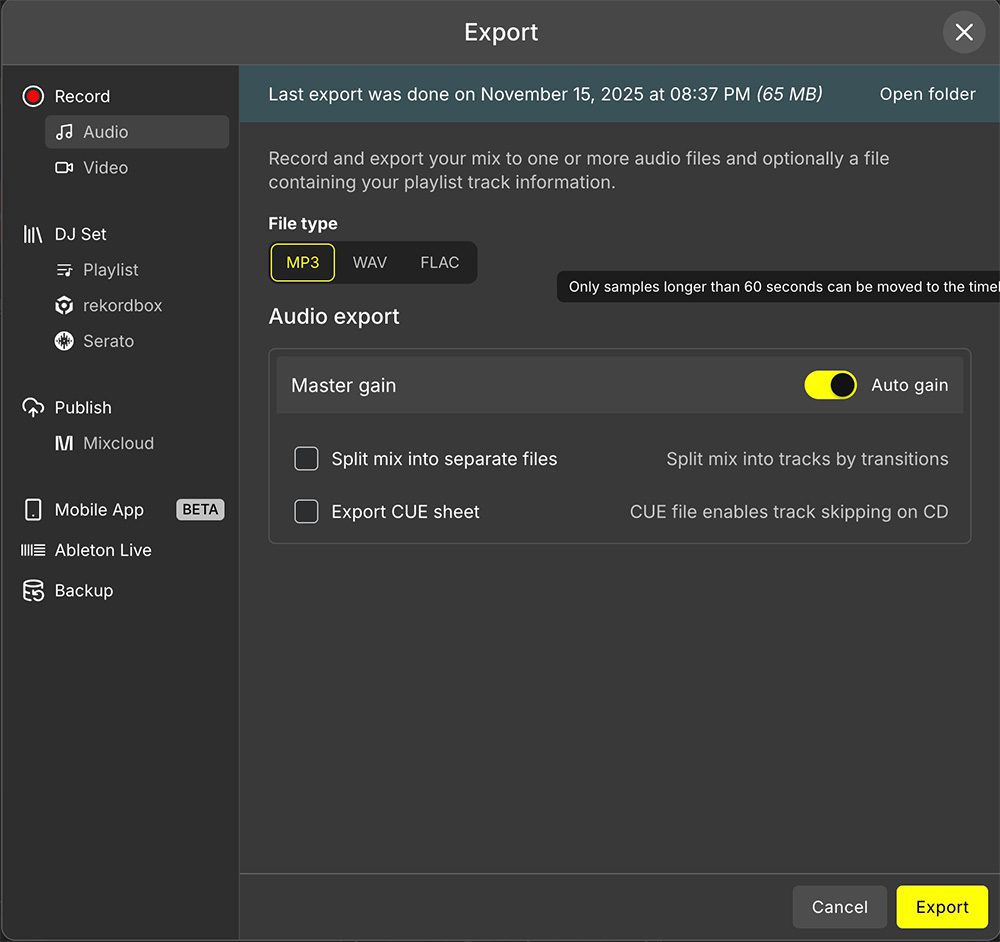
Exporting Your DJ Mix
Exporting from DJ Studio
Once happy with your DJ mix/radio show, you can export it into one audio file, ready to be uploaded and scheduled on your Radio.co station.
Go to File, Export, ensure MP3 is toggled on and click export.
Note: When exporting your mix, DJ Studio has to play and record your mix to export it. It does so silently and at an increased speed.
Uploading and Scheduling Your DJ Mix on Your Radio Station
Once exported, you have your mix on your computer ready to be uploaded to your Radio.co schedule.
Log in to Radio.co studio.
To upload your mix, click the 'Upload Media' button in the top right corner of the dashboard, select your mix from your computer click upload. When finished, your mix can be found under Media. For this to be scheduled, we’ll need to create a playlist and add your audio file to this playlist.
Note: This means each time you have a new mix for a recurring show, the previous mix can be swapped out for the latest.
Go to the Playlists tab from the list of options on the right hand side and create a playlist.

In the next window, complete your playlists metadata and use your radio show name or mix name for the playlist titles to make it easy to identify when scheduling.
Now, you need to add your mix into the playlist. In the next window, either drag and drop your uploaded mix from tracks or use the plus icon.
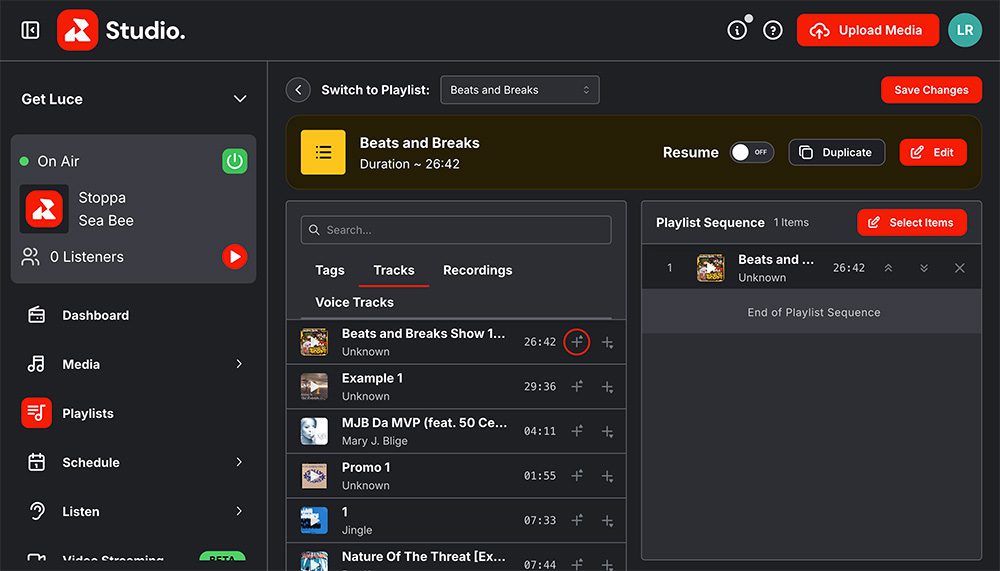
Once you’ve added your mix into the playlist, save changes.
Now your mix is ready to schedule!
Go to Schedule and either click the Create Event button or choose the date and time directly on your schedule to open the Event Window.
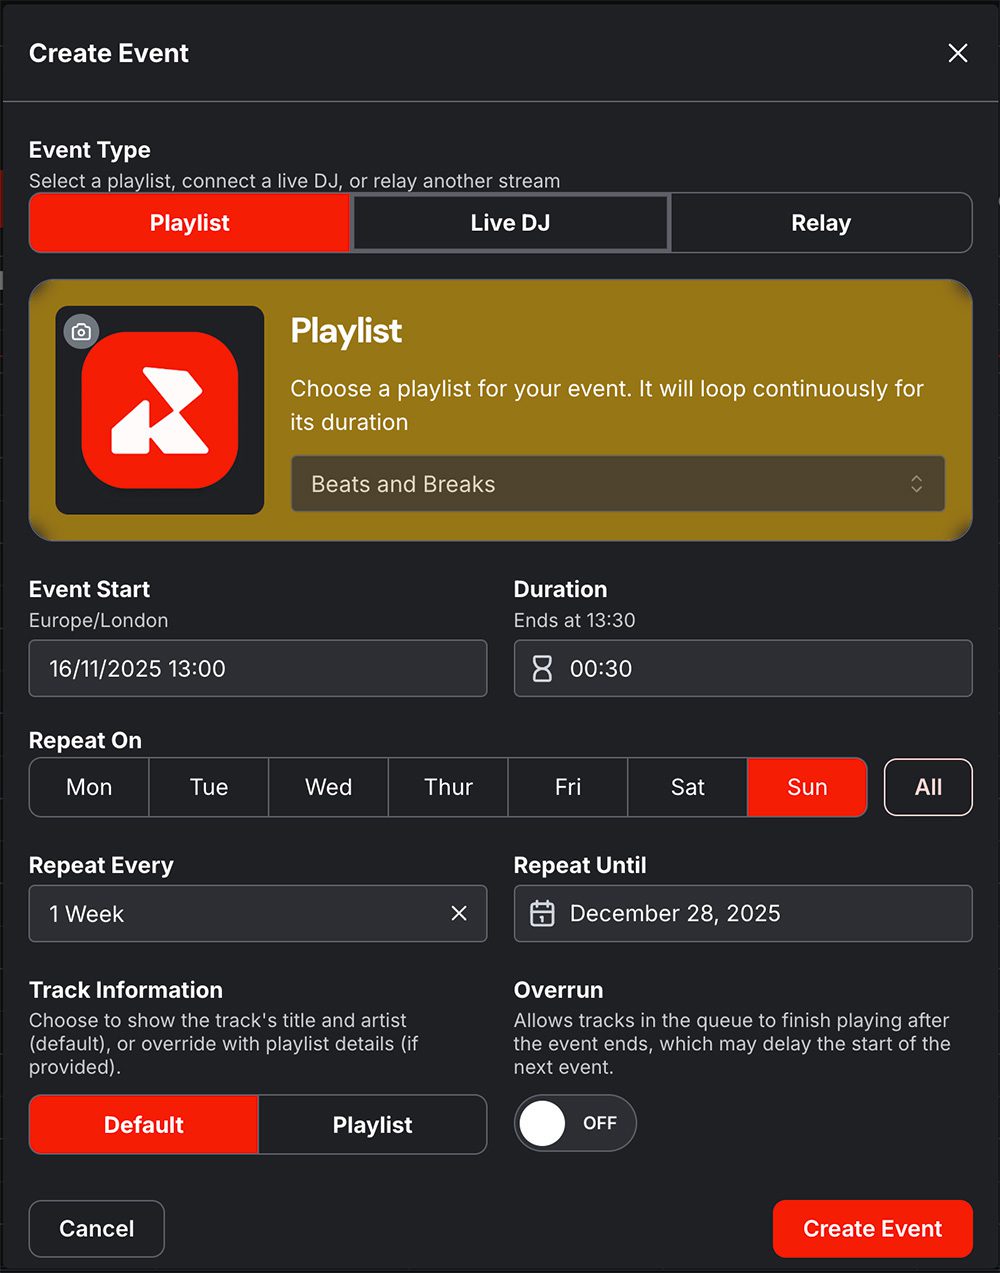
With Playlist Selected, choose the Playlist you’ve just created from the drop down.
Complete any other settings, like if you want the show to repeat and how regularly, and then click Create Event.
Your Mix has now been scheduled to play on your radio station.
Final Thoughts
The radio space is one place people listen to their favourite DJs and find new ones, often checking out their sound before they see them live. But for the time-pressed or those without gear, creating professional mixes can be tricky.
DJ Studio offers a neat solution for speeding up the process and without decks, while still allowing for creativity and individuality. It can even help ensure your stations new hosts and DJs turn in professional content while they're still learning their craft.
Interested? Radio.co customers get 15% off DJ Studio one-time purchase plans when using the code: RADIOCO.
🎧 Try it for yourself→ Visit DJ Studio.


